Category Archives: Uncategorized

>Summer Week 1 (Beet Greens, Kale)

>THIS WEEK’S SUBSCRIBER MENU:
• Pea Shoots (see Winter Make-up Week 1 for recipes)
• Lacinato Kale
• Wild Greens (see Winter Make-up Week 4 for recipes)
• Beet Greens with Baby Beets
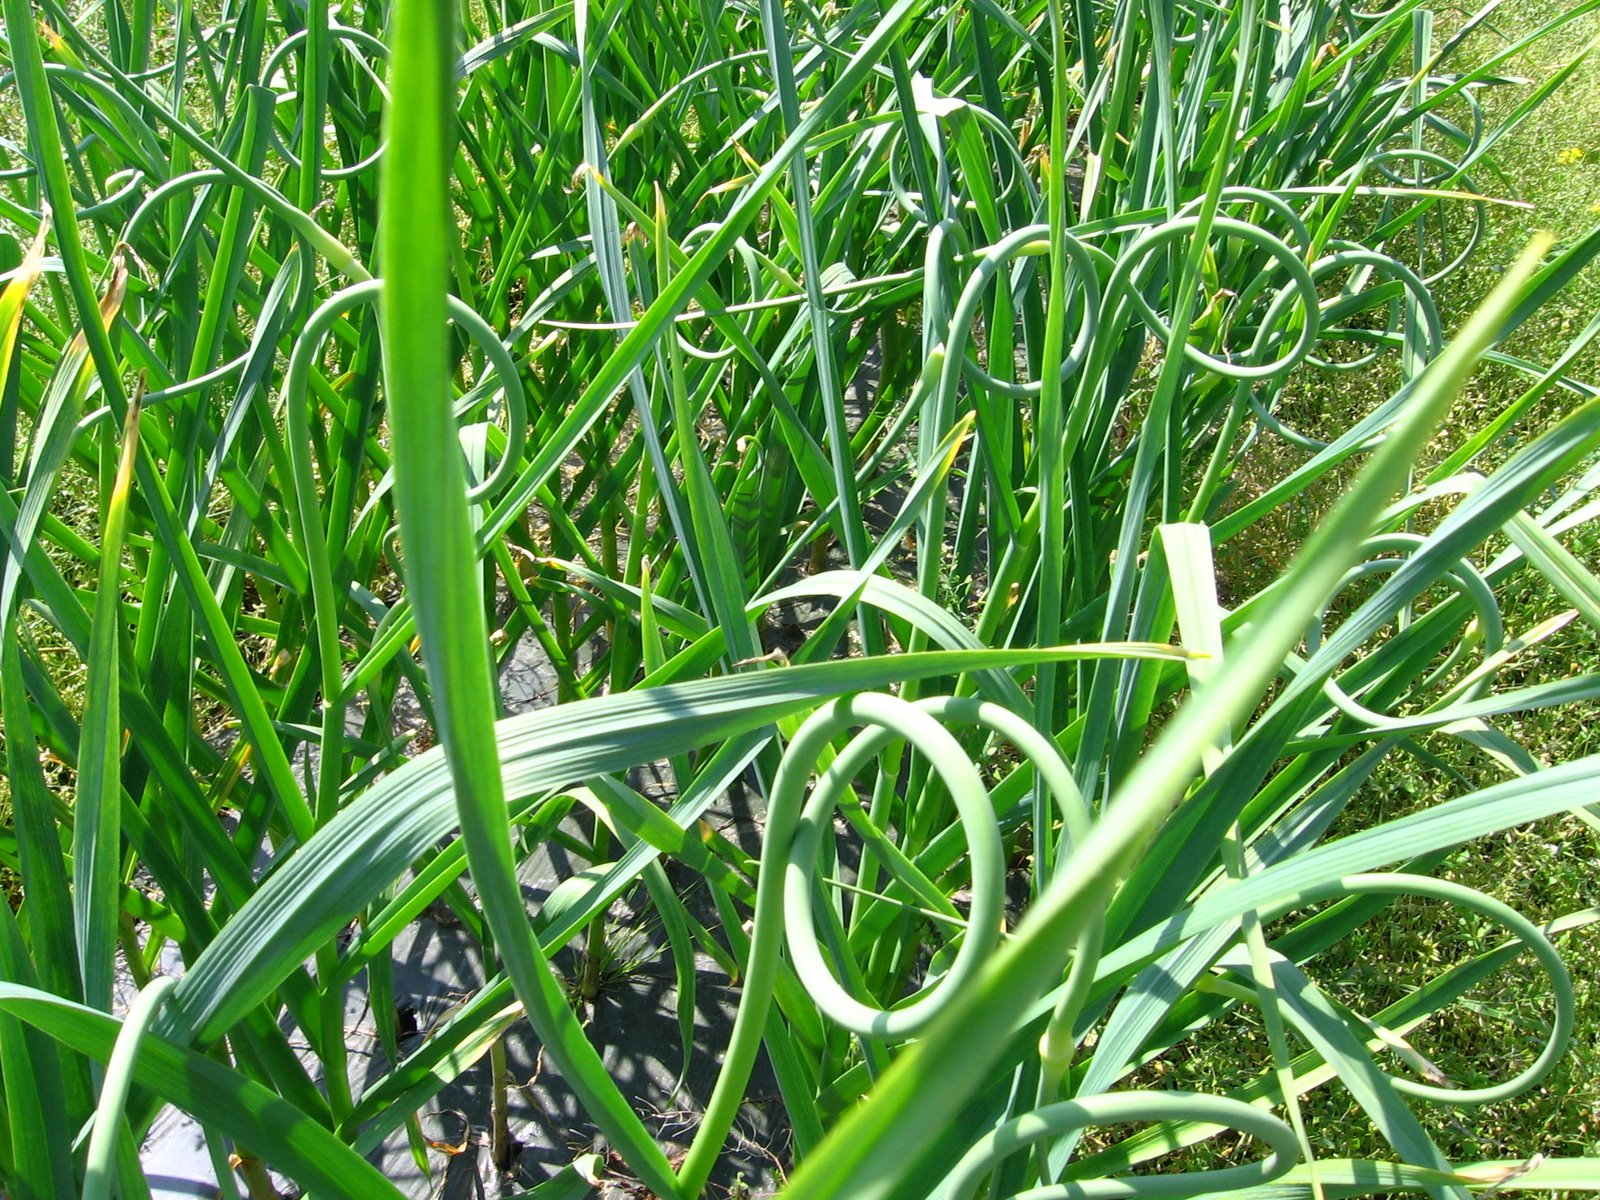
• Green Garlic or Salad Onions or Garlic Scapes (see Winter Make-up Week 3 for Scapes recipes, and Winter Make-up Week 2 for Green Garlic)
• Fresh Mint

FRUIT SHARES:
Fruit shares will start next week with Strawberries from our neighbor, T & M Berries

COMING SOON:
• Shelling Peas
• Sugar Snap Peas
• Spinach
• Green Onions
• Lettuce

U-PICK AT THE FARM:
We have some flowers now that overwintered and volunteered from last year. Bachelor buttons, larkspur, poppies, love-in-a-mist, and black-eyed susans.

Welcome new subscribers, and those returning from previous years and/or previous seasons!

The quantity of produce is low this week, as it typically is the first week of the summer season. But we are gearing up for a full summer. So many things are on the way! We find that our new subscribers use these early weeks to ease into the CSA/subscription eating style, getting used to eating seasonally and using what is given. Please feel free to ask any questions you might have. Email is the best way to reach me in the summer, as I’m not comfortable returning phone calls after dark.

At the moment, the summer solstice is upon us and we are incredibly overwhelmed with work. Not that I’m an extremely “new age” or spiritual, but it is the longest day of the year. Our life is chaotic and without structure. I reflect on our peaceful winter family time often. We get up at 5:30, do chores, get the kids off to their respective daytime activities. Then we are able to focus on work for a few hours until they come home exhausted. Then we go back to work until about 9:00pm, then do evening chores. We rarely cook and eat dinner now—instead we snack on vegetables, fruit from the market (it helps to set up next to organic fruit vendors), and dairy. With our own milk cow, we drink a lot of milk and eat a lot of yogurt, and some of my cheeses from last fall are ready to eat. However, Sunday night I have a farmers market dinner, with wild salmon from Loki Fish, ravioli from the pasta vendor there, and whatever fresh green thing I bring home as leftovers. Monday is usually my only other “cooking” day, and I try to make it something easy.

Every spring I wait anxiously for the beet greens to be ready to make this pasta dish. It’s from the Chez Panisse “Vegetables” book. I love the combination of flavors and the lovely rosy hue it turns the pasta. We use whole wheat bowties usually, and it still turns pink, which means Della will eat it.

Please look at previous blog posts as indicated for recipes for the unusual items. And, if you have any cooking ideas of your own, be sure and post them in “comments” on the blog.

BEET GREEN PASTA
1/4 cup Currants
1 to 2 bunches Beet Greens
1 small bunch Fresh Mint
1 medium Red Onion (or a few salad onions)
1 to 2 cloves Garlic
1 Bay Leaf
1/4 cup Olive Oil
1/2 pound Dried Pasta, such as rotini, penne, bowties
Salt and Pepper

1. Cover the currants with boiling water, let them soak for 15 minutes, and drain them. While they are soaking, wash the beet greens, strip the leaves from the stems, and cut the leaves into chiffonade. Chop the stems into 2-inch lengths. Stem the mint, wash the leaves and chop into a chiffonade (ribbons).
2. Put on a pot of salted water for the pasta. Peel the onions and the garlic and chop them both fine. Sauté them with the bay leaf over medium heat in 1/8 cup of olive oil for about 5 minutes or until they are translucent. Add the beet leaves and stems and the currants and cook 5 minutes more, covered. Meanwhile, when the water has come to a boil, add the pasta. Uncover the beet greens, season wtih salt and pepper, and add the mint leaves. When the pasta is cooked, drain it and toss well with the sauce, moistening it with a ladle of the pasta water and the rest of the olive oil. Serve immediately.

STIR-FRIED BEET GREENS WITH GINGER & GREEN CHILES
1-1/2 tbsp. Peanut or Canola Oil
1/2 fresh Hot Green Chile, cut into long, fine slivers
1-1/2 slices Fresh Ginger, cut into long, fine slivers
1/2 pound Beet Greens, cut crosswise into fine ribbons
Dash Salt, or to taste

1. Put the oil in a large pan and set over medium-high heat. When hot, put in the chile and ginger. Stir a few times and put in the beet greens. Stir a few times and then cover the pan.
2. Turn the heat down to low and cook until the leaves have wilted. Add the salt and stir a few times. Add 4 tbsp. water, bring to a simmer, and cover.
3. Cook on low heat for about 30 minutes, or until the greens are tender. Stir every now and then during this period. Serve with pasta or rice.

And another kale recipe from Angelic Organics, a CSA farm in Illinois:
KALE PESTO
1/4 cup Chopped Walnuts
1 tbsp. plus 1/2 tsp. Salt, divided
1/2 pound Kale, coarsely chopped
2 cloves Garlic, minced
1/2 cup Olive Oil
1/2 cup Freshly Grated Parmesan Cheese (about 1-1/2 ounces)
Fresh Ground Black Pepper

1. Toast the chopped walnuts in a dry, heavy skillet (preferably cast iron) over high heat, stirring constantly, until they start to brown in spots and become fragrant. Be careful not to overtoast them, as they will burn very quickly once they are toasted. Immediately transfer the walnuts to a dish to cool.
2. Bring two quarts of water to a boil. Add 1 tablespoon salt, then add the kale. Cook kale until tender, about 10 minutes. Drain.
3. Put the garlic, walnuts, and kale in a blender or food processor; pulse until well combined. With the blender or food processor running, pour in the olive oil in a steady, smooth, pencil-thin stream.
4. When the ingredients are thoroughly combined, transfer to a bowl. Stir in the Parmesan, remaining 1/2 tsp. salt, and pepper. Serve hot.

>Winter Make-up Week 4 (Quelites)

>THIS WEEK’S SUBSCRIBER MENU
• Salad Mix
• Spinach
• Pea Shoots
• Wild Greens
• Green Garlic

COMING SOON
• Beet Greens
• Green Onions
• Pea Shoots
• Peas

Here’s a link to Mariquita Farm’s photo essay on making GREEN GARLIC PESTO:
http://www.mariquita.com/recipes/greengarlicpesto.html

There are times when we are over-run with weeds, usually after it has rained substantially after being very warm for weeks. Kind of like now. Our future carrot patch is full of wild plants, mostly Amaranth (pigweed) and Chenopodium (also called lamb’s quarters, white goosefoot, or fat hen). The Latinos call these plants Quelites. This is a common weed that is one of those marvelous wild plants that’s completely edible, delicious and nutritious. Use it where you would spinach, raw or cooked. I have purjured these recipes from the Mariquita Farm website (they are a market farm in California, and they have an amazing website, farm, and newsletter.)

It can be eaten raw in salads, pasta salads on sandwiches or use in soups or stir-fry. Steam it like spinach and serve like a side dish or put in an omelet or lasagna. It is quite versatile as a garnish and the mild flavor blends well with other vegetables.

GREENS TACOS
courtesy Mariquita Farm

This recipe is one of my favorite breakfast recipes, but of course it would work at any time of day. Please note the amounts given are approximate, I don’t measure anything when I make these. You could use more or less of any one of these ingredients.

3/4 pounds greens, such as lambs quarters, cleaned well and sliced into approximate 1 inch pieces
2 teaspoons cooking oil
2 stalks green garlic, cleaned as a leek and chopped, or another alium family, whatever you have on hand (onion, green onion, garlic, leek…..)
Pinch red pepper flakes or cayenne
2 Tablespoons cream cheese
4-6 small corn tortillas or 2-3 larger flour ones

1. Heat the oil and add the garlic, having the greens ready to go, and cook garlic for about 30 seconds. Then add greens and cook until bright green and wilted, add red pepper (and salt and black pepper if you like). Take off heat and stir in cream cheese.

2. Heat tortillas, divide filling among them. Eat and enjoy.

QUELITES (Lamb’s Quarters) AND BEANS
courtesy Mariquita Farm (adapted from The Vegetarian Times, July 1997)

1 pound fresh lamb’s quarters or spinach — bigger stems removed
1 tablespoon olive oil
3 stems green garlic or 3 cloves ‘regular’ garlic — minced
3 leeks — finely chopped
1 cup canned pinto beans — rinsed and drained
1 teaspoon chili powder
salt and pepper — to taste

1. Rinse greens several times to make sure that all sand and grit are removed.

2. Steam greens in tightly covered pot until wilted. Drain greens and finely chop them. In large skillet, heat oil over medium heat. Add garlic/onions and cook, stirring frequently, until leeks are soft, 2 to 3 minutes.

3. Stir in greens, beans and chili powder. Cover and cook over low heat for 5 minutes or until heated through.

4. Season with salt and pepper and serve.

>Winter Make-up Week 3

>THIS WEEK’S SUBSCRIBER MENU
• Salad Mix
• Stir-Fry Mixed Greens
• Spinach
• Spring Onions
• Sorrel or Garlic Scapes
• Mint

COMING SOON
• Beet Greens
• Green Onions
• Pea Shoots
• Peas

After two weeks of record-breaking heat, we’re ready for this nice cool change in the weather. A brief chance to relax on the watering. Although we certainly didn’t get enough to irrigate crops, the water did get a better chance to work its magic without evaporating. The cool weather is also keeping the nasty flea beetles at bay. Flea beetles are our biggest pest problem, and they voraciously attack any plant in the mustard family, which includes arugula, broccoli, cabbage, bok choy, and a host of other spring crops. If you see tiny holes in your leaves, blame the flea beetles.

This week we have more salad greens, plus we harvested the overgrown rows of mustards that were meant for salad, but grew too quickly. Now they qualify as stir-fry greens. You can quickly sauté them, or braise them. Try them cooked with a little chopped onion or garlic scape.


The garlic scapes can be cooked like asparagus—my favorite thing to do is brush them with a bit of olive oil and throw them on the barbecue—but they can also be roasted in the oven, or sautéed. Expect them to have the texture of asparagus, but with a mild garlic flavor.

You know, it’s hard not to compare ourselves to the larger, conventional farms around us. Carpinito Brothers, who is a pretty good neighbor to us and about 30 times our size, grows mainly greens—lettuce, spinach, radishes. We watch them get their ground ready, plant, pour on water, and harvest spinach in about 20 days. They must use the equivalent of plant steroids, they use so much fertlizer and water. By contrast we plant spinach and it takes nearly twice as long to grow to a harvestable size. We don’t have the luxury of all that free water, and we do everything by hand, without chemicals. Sometimes we feel like we’re doing something wrong—I mean, their stuff is ready TWICE AS FAST as ours. But then, if you look at a bunch of their spinach and compare it to a bunch of ours, you can see the difference. Theirs is pale, thin, and mushes into a bunch—grocery store spinach—that needs to be picked through. Ours is dense, dark, and clean. I have to believe that because ours takes twice as long to grow to harvestable size with it’s vibrant healthy color, it must also be more nutritious.

So, eat up and remember that speed and quantity aren’t everything, and bigger isn’t always better!

>Winter Make-up Week 2 (Green Garlic, Cardoons)

>THIS WEEK’S SUBSCRIBER MENU
• Salad Mix
• Spinach
• Baby Bok Choi
• Green Garlic*
• Cardoon*
• “Lacinato” Kale

* see recipes at the end

COMING SOON
• Spring Salad Mix
• Stir-Fry Greens
• Green Onions

First of all, we would like to apologize for being so very late with our Tuesday delivery. It was one of those days in which everything goes wrong. And, to top it off, we didn’t realize the salad mix was ready to harvest until late Tuesday. We will make it up to the Tuesday folks next week. I’m sure you will be disappointed when you read this and find out you missed the salad, but we will make sure you have extra next week.

The heat wave has got things growing, and we have sprinklers running 24/7 right now to keep all the little plants hydrated. It doesn’t take long for them to crisp to nothingness when it’s in the 90°s.

Much on the way, the peas and favas are blooming, onions are growing well in their plastic mulch beds, and salad greens are here to stay. We should be able to put together a stir-fry mix next week—perfect for those hot nights as it only takes a minute to cook.

PENNE WITH RICOTTA AND GREEN GARLIC SAUCE
1-1/2 cups fresh Whole-Milk Ricotta, or a 15-ounce container whole-milk ricotta
1/4 cup finely minced Green Garlic
2 tablespoons minced Parsley
Salt and freshly ground Pepper to taste
1 pound Dried Penne or Fusilli Pasta
2 tbsp Butter
1/4 cup freshly grated Parmesan Cheese, plus grated Parmesan for the table

1. Combine the ricotta, green garlic and 1 tablespoon of the parsley in a large bowl; season with salt and pepper.

2. Bring a large pot of salted water to a boil over high heat. Add the pasta and cook until al dente. Just before pasta is done, remove 1/2 cup of the boiling water. Whisk enough of the hot water into the ricotta to make a smooth, creamy sauce.

3. Drain the pasta and add to the sauce along with the butter. Toss well. Add 1/4 cup Parmesan cheese and toss again, adding a little more of the hot water if needed to thin the sauce. Taste and adjust seasoning.

4. Serve on warm plates, topping each portion with some of the remaining parsley. Pass additional Parmesan at the table.

CARDOON
Cardoons grow wild in the Mediterranean, and so they are eaten and enjoyed in Italy, France, and Spain, and northern Africa. They are a close relative of the thistle and, of course, the artichoke. They require several steps of preparation, but they are worth the effort. Small or medium stalks are the most tender and need the least amount of preparation. The stalks should be solid, not spongy, no matter their size. They will keep in the refrigerator for several days, wrapped in moist paper or plastic.
To prepare: trim the leaves and any spiny skin off the stalks. Cut the stalks into manageable lengths about 3 inches long, and put in a bowl of cold water acidulated with lemon juice or vinegar to prevent browning. One by one, peel the skin off the pieces and tear off the largest strings, as you would from celery stalks, returning each piece to the water as you finish. Parboil the trimmed stalks in salted water until tender, and then proceed with cooking. Sometimes it’s easier to peel and string them after parboiling, and some stalks are tender enough not to need blanching at all.

CARDOON GRATIN
3 cups heavy cream
1 cup chicken stock
1 bay leaf
Salt and freshly ground black pepper
3 lbs. cardoons
1 cup grated Gruyère

1. Place cream, stock, and bay leaf in a large saucepan and season to taste with salt and pepper. Wash cardoons, then remove and discard tough outer stalks. Cut away thorns and pull off stringy fibers. Cut cardoons into 1 1/2’’–2’’ pieces, placing them immediately into cream mixture as you go, to prevent them from discoloring.

2. Bring cream mixture to a simmer over medium heat and cook, stirring occasionally, until cardoons are tender, about 1 hour. Using a slotted spoon, transfer cardoon pieces to individual gratin dishes (or a 1-quart baking dish).

3. Preheat oven to 350°. Reduce cream mixture to about 3/4 cup over medium heat, about 30 minutes. Discard bay leaf and divide reduced sauce equally between gratin dishes, sprinkle gruyère on top, and bake until golden and bubbly, about 30 minutes.

CARDOON FRITTERS
Cardoons
White Flour
Egg, beaten with a fork
Fresh Fine Bread Crumbs
Peanut Oil

1. Choose cardoons with white, tender-looking hearts. Strip the strings from the stalks (just as one would do with celery) and then parboil the cardoons in salted, acidulated water. Drain them when just tender. Cut the stalks into 3-inch by 1-inch sticks. Dredge them in flour, shake off the excess, then dip them in egg and finally in fine bread crumbs. Deep-fry them in peanut oil at 360° until golden brown. Drain on towels and serve.

2. You can also make cardoon fritters in batter. Trim the cardoons, string and parboil them, and cut into sticks, as described above. Dry the cardoons and marinate in a mixture of olive oil, lemon juice, and chopped parsley. Dip the slices in fritter batter and deep-fry in peanut oil heated to 375° until lightly browned. Drain on towels, salt, and serve. If you like, batter-fry thinly sliced and seeded Meyer lemons to serve with the cardoons.

CARDOON GRATIN
Cardoons
Olive Oil
Salt
Lemon Slices
Cream
Chicken or Vegetable Stock (optional)

1. Trim the cardoons and cut them into 3-inch lengths. Simmer them in a nonreactive pan, well covered with water flavored wtih salt, olive oil, and lemon, for 35 to 45 minutes, until tender. When cool enough to handle, peel away the strings from the cardoons, as you would with celery.

2. Arrange a thick layer of cardoons in a buttered earthenware gratin dish. Just cover with cream, or a mixture of cream and stock, season with salt and pepper, and sprinkle with grated Parmesan. Bake in a preheated 375° oven until browned and bubbly. Serve garnished with chopped parsley and chervil.

CARDOONS IN BECHAMEL SAUCE—”CARDONI IN BALSAMELLA”
Cardoons (See below for amounts)
Butter
Salt and pepper
Milk or cream

1. Discard the toughest ribs, strip the filaments from the others, and boil them in salted water until half cooked.

2. Cut the cardoons into inch long pieces and sauté them with butter and salt to taste. Add some milk, or, even better, cream, and simmer them until they’re done, then bind the sauce with a tablespoon or two of béchamel sauce. Sprinkle the vegetables with grated Parmigiano and remove them at once from the flames. This dish goes very well with pot roasts, stewed cutlets, stewed giblets, and other such dishes. Coarsely diced turnips can be cooked in the same manner, as can diced potatoes, or sliced zucchini, though the latter shouldn’t be boiled first.

STEWED CARDOONS—”CARDONI EN UMIDO”
Cardoons (1 pound for four people)
Garlic
Herbs
Olive oil

1. Wash the cardoons, strip away the fibers, and chop them into 2-inch lengths. Boil them until close to fork tender in lightly salted water. In the meantime, mince two cloves of garlic and a bunch of parsley.

2. When the cardoons are done, drain them, and then finish cooking them in a skillet with the 1/4 cup olive oil, the minced herbs, and salt and pepper to taste.

3. If you would like them better tasting and more elegant, pour an egg-and-lemon sauce over them after transferring them to the serving dish. To make the sauce, beat several eggs with the juice of a lemon, heat the mixture over a low flame, stirring constantly, till it begins to thicken, and pour it over the vegetables. If you choose not to use the sauce, at least sprinkle the cardoons with a pinch of grated Parmigiano.

>Winter Make-up Week 1 (Asian Greens, Pea Shoots, Rapini)

>THIS WEEK’S SUBSCRIBER MENU
• Rapini (*see recipes at the end)
• Baby Bok Choi (*see recipes at the end)
• Pea Shoots
• Spring Onions, Leek Scapes, or Green Garlic
• Greenhouse “Weeds” or Dandelion Greens
• Mint

COMING SOON
• Spring Salad Mix
• Stir-Fry Greens
• Green Onions
• Spinach

We’re still in recovery from the spring slump, I’m afraid. The glorious sunny weather last week, and the deluge of rain over the weekend mean the new greens will be bursting forth soon. We’ve got a beautiful patch of spinach on the way, plus salad greens and stir-fry greens that just needed an extra push. We’ve almost got all of the onions planted, so green onions won’t be long either. And, as if summer were really almost here, we’re nearly ready to plant our two acres of winter squashes, plus the summer squashes, cucumbers, sweet corn, and beans, and the first set of broccoli and cabbage transplants are on their way out of the greenhouse and into the field. The greenhouses are cleaned-up and ready to fertilize for planting tomatoes, peppers, and fancy cucumbers. And, the cut-flower garden is nearly ready to start planting, at last. There will soon be a bit out there for cutting though—things that made it through the winter, like larkspur, bachelor buttons, and black-eyed susans.

The mint is in full-form now—it is the most bountiful spring herb, after all. I’ve had reports that it’s great in tea, either alone or with green or black teas. Personally, I like it with peas (or pea shoots, before the peas come on) and it’s great with beets, and beet greens. I whipped together a pasta dish one evening with about a pound of pasta, a chunk of fresh chevre (goat cheese) and a bunch of chopped fresh mint, plus salt and pepper. I might have used a little oil to moisten the whole thing. I chopped and blanched the bunch of pea shoots and tossed the whole thing together. Even the kids ate it.

If you choose the leek scapes this week, you can use them just like the infamous garlic scapes (a.k.a. garlic curls) of June. Chop them up and use them like a leek, garlic, or green onion. Or, they can be roasted or grilled just like asparagus—of course, they will taste a bit of the onion family, not like asparagus.

Our steamy greenhouse is rife with “weeds”—lambsquarter, amaranth, purslane, and chicories. Other cultures consider these weeds delicious, and they are all very nutritious. You can use them just like spinach, a quick sauté is all they need.

I love the combination of mint and onions. Any kind of onions. One of the best van-loads of produce on the way to market or Flying Fish restaurant is when there is an abundance of onions and mint. (Second only to a van-load of basil. Maybe it’s a tie, I’m not sure now that I remember it.) They’re great together in a raita, mixed into yogurt as a dip. They’re both great together in a rice salad or tabbouleh.

ONION & MINT RAITA
4 Scallions (or 2-3 Salad Onions)
1 cup Plain Yogurt
1/3 tsp. Salt
Black Pepper to taste
1 tsp. ground toasted Cumin Seeds
1/8 tsp. Cayenne, optional
2–3 tbsp. finely chopped Fresh Mint

1. Cut the scallions into very thin rounds starting at the white section and going halfway up the pale green section. Do not use the green parts. Put them into a small bowl filled with ice-cold water. Cover and refrigerate for 1 to 2 hours. Drain. Put the sliced scallions in a dish towel. Bring the 4 ends of the towel together and squeeze out as much moisture as possible from the scallions. Set aside.
2. Put the yogurt in a bowl and whisk lightly with a fork until smooth and creamy. Add the salt, pepper, cumin, and cayenne and mix well, then add the scallions and mint. Serve chilled.
Excellent with bean dishes, or with a simple salad of spinach or mizuna, delicate quick-cooked spinach or Swiss chard, and/or cooked grains.

GINGER-SESAME BOK CHOI
1 tablespoon rice vinegar
1 tablespoon soy sauce
1/4 teaspoon toasted sesame oil
5 thin slices peeled fresh ginger
4 to 5 baby bok choy, (1 pound), each halved lengthwise

1. In a small bowl, whisk together vinegar, soy sauce, and sesame oil. Set aside.
2. In a large skillet with a tight-fitting lid, bring 1 cup water and ginger to a boil. Add the bok choy; reduce to a simmer.
3. Cover and cook until leaves are vibrant green and stems are fork-tender, 3 to 5 minutes. Drain well; discard ginger.
4. Transfer bok choy to a serving platter; drizzle with the vinegar-soy mixture, and serve immediately.

WILTED ASIAN GREENS
3 tbsp. Rice Vinegar (not seasoned)
1-1/2 tbsp. Soy Sauce
1-1/4 tsp. Sugar
1-1/4 tsp. finely grated peeled Fresh Ginger
3/4 tsp. Sesame Oil
3 cups Pea Shoots
6 cups Asian Greens, such as tatsoi, mizuna, or baby bok choi

1. Heat vinegar, soy sauce, sugar, ginger, and sesame oil in a small saucepan over moderately low heat, stirring, until sugar is dissolved (do not let boil).
2. Pour hot dressing over greens in a large bowl and toss well. Serve immediately.

PEAS & PEA TENDRILS WITH LEMON DRESSING
1/4 cup Olive Oil
2 tbsp Fresh Lemon Juice
1 tsp Sugar
2 cups Shelled Fresh Peas or one 10-ounce package frozen Petite Peas, unthawed
8 ounces Pea Tendrils, cut into 4-inch lengths

1. Whisk oil, lemon juice, and sugar in small bowl to blend; set dressing aside.
2. Bring large pot of salted water to boil. Add fresh or frozen peas and cook 3 minutes. Add pea tendrils; cook 1 minute. Drain well. Return vegetables to pot; add oil-lemon dressing and toss to coat. Season with salt and pepper.

PEA SHOOT PESTO
1 small Garlic Clove, smashed
1/4 cup Cilantro leaves (optional)
4 ounces Pea Shoots, coarsely chopped
3 tbsp. Fresh Lime Juice (about 2 limes)
1/3 cup Olive Oil
3.4 cup Grated Parmesan Cheese
1-1/2 tsp. Salt and 1/4 tsp. Freshly Ground Pepper
1. Purée all ingredients in a blender. If not using immediately, refrigerate in a airtight container up to 1 week.
2. Use like basil pesto. Delicious on pasta or sandwiches, or spread onto slices of rustic bread and top with shaved Parmesan cheese, or spoon it over soft goat cheese.

PIZZA WITH RAPINI, ROASTED ONIONS, & OLIVES
Pizza Dough for 1 Pizza
1 medium Yellow Onion, diced Olive Oil
1 bunch Broccoli, Kale, or Turnip Sprouts, or Rapini
1 pinch Hot Pepper Flakes
1 clove Garlic, peeled and finely chopped
1/2 cup Grated Mozzarella Cheese
16 Nicoise or Kalamata Olives, pitted 1 Lemon

1. Preheat oven to 375°. Toss the onion in a small ovenproof sauté pan with a pinch of salt & enough olive oil to coat lightly. Put the pan in the oven & roast, stirring occasionally, until the onion is cooked & golden, about 30 minutes.
2. Wash & drain the broccoli, remove the tougher stems, & roughly chop the leaves & sprouts.You should have 2 cups. Heat a large sauté pan & coat it with olive oil. Add the broccoli, season with salt, pepper & the hot pepper flakes, & fry over high heat until the broccoli is tender. Add the garlic & fry, tossing, for a few seconds.
3. When the onions are done, take them out of the oven & turn the heat up to 450°. Roll out a 12 to 14 inch disk of pizza dough & slide it onto a floured baking sheet. Lightly brush the dough with olive oil. Evenly sprinkle with the cheese, spread the onions over, & top with the broccoli & olives. Drizzle about 1 tsp. olive oil over the pizza. Slide the pizza into the oven & bake from 5 to 10 minutes, until the crust is brown & crisp. Remove from the oven, sprinkle with a few drops of lemon juice, slice, & serve.

RAPINI WITH THEME AND THREE VARIATIONS
adapted from Cook’s Illustrated

BLANCHED RAPINI(Broccoli Raab)
1 pound Rapini (broccoli rabe), washed, cut into 1-inch pieces
2 teaspoons Salt
1. Bring 3 quarts water to boil in large saucepan. Stir in rapini greens and salt and cook until wilted and tender, about 2 1/2 minutes. Drain and set aside.
2. Cool empty saucepan by rinsing under cold running water. Fill cooled saucepan with cold water and submerge greens to stop the cooking process. Drain again; squeeze well to dry (or twirl in a salad spinner) and proceed with one of the following recipes.

Variation 1: RAPINI WITH GARLIC & RED PEPPER FLAKES
2 T extra virgin Olive Oil
3 medium Garlic Cloves
1/4 teaspoon Red Pepper Flakes
1 recipe Blanched Rapini Greens (above)

1. Heat oil, garlic and red pepper flakes in medium skillet over medium heat until garlic begins to sizzle, about 3 to 4 minutes. Increase heat to medium high, add blanched rapini greens,
and cook, stirring to coat with oil, until heated through, about
1 minute. Season to taste with salt, serve immediately.

Variation 2: RAPINI WITH SUN-DRIED TOMATOES & PINE NUTS
Ingredients for Variation 1, plus
1/4 cup Oil-Packed Sun-dried Tomatoes, cut into thin strips
3 tbsp. Toasted Pine Nuts

1. Follow recipe for Rapini with Garlic and Red Pepper Flakes, adding sun-dried tomatoes, garlic, and red pepper flakes.
Add toasted pine nuts to skillet with rapini greens.

Variation 3: RAPINI WITH ASIAN FLAVORS
Ingredients for Variation 1, plus
1 tbsp. Soy Sauce
1 1/2 tsp. Rice Wine Vinegar
1 tsp. Toasted Sesame Oil
1 tsp. Sugar
1/2 tsp. Finely Grated Ginger

1. Mix soy sauce, rice wine vinegar, toasted sesame oil, and sugar in small bowl; set aside. Follow recipe for Rapini with Garlic
and Red Pepper Flakes, adding ginger along with garlic and red pepper flakes. Add reserved soy sauce mixture to skillet along with rapini.

>Spring Week 10 (Arugula)

>THIS WEEK’S SUBSCRIBER MENU
• Lacinato Kale
• Arugula (*see recipes at the end)
• Baby Bok Choi
• Chives
• Swiss Chard, Pea Shoots, or Radishes
• Leaf Fennel or Mint

COMING SOON
• Spring Salad Mix
• Stir-Fry Greens
• Green Onions
• Rapini

Every year there is a bad week for subscribers. It is the week after the weather warms up drastically, usually in May, when all of the overwintered crops become overmature, but the newly-planted crops haven’t had enough time to grow for harvest. That happened this week, and as a result we just don’t have much selection. We have done what we can for you, and we promise that it will be better soon. Spinach is on the way, and so is the salad mix and braising mix. And we are planting more every day—the bounty is on the way!

Use Leaf Fennel as a licorice-flavored substitute for celery. It’s especially tasty in a tuna or chicken salad, or in a green salad. It can also be roasted or sautéed with mixed greens. The Baby Bok Choi can be used just like spinach—sautée or steam briefly and season to taste.

We start our winter make-up of four weeks next week, and our summer season will start in five weeks.

ARUGULA & OLIVE SALAD
About 14 ounces Arugula
20 oil-cured Black Olives (Kalamata olives are tasty too)
2 slices firm-textured White Bread
1-1/2 tsp. Virgin Olive Oil
LEMON DRESSING
1-1/2 tbsp. Lemon Juice
2 tbsp. Virgin Olive Oil
1/4 tsp. Salt
1/8 tsp. freshly-ground Black Pepper
1. Preheat oven to 400°.
2. Wash the arugula, removing and discarding the tough outer leaves and stems. Dry it thoroughly, taking care not to bruise the leaves.
3. Pit the olives and cut them into 1/2-inch pieces.
4. Trim the crusts from the bread slices, and cut the bread into 1/2-inch cubes. Place the bread cubes in a bowl, add the 1-1/2 tsp. of olive oil, and toss to coat them well. Arrange the cubes on a baking tray, and bake them at 400° for 8 minutes, until they are well browned. Set aside.
5. In a bowl large enough to hold the arugula, mix dressing ingredients. Add the arugula to the bowl containing the dressing, and toss well to combine. Divide the arugula among four plates, and sprinkle the olives and croutons on top and around the greens. Serve immediately.

OTHER ARUGULA IDEAS:
The pleasant nutty, slightly spicy flavor of arugula lends itself to being used fresh in a salad or on a sandwich, being puréed with olive oil into a pesto, or being sautéed briefly like spinach as a cooked green. It’s especially tasty with something salty like olives or strong cheese, or with a splash of vinegar or lemon juice. And it’s tasty with chicken.

>A Farm is a Great Place to Raise Kids

>Since I was pregnant with Della, one of the most frequent comments I’ve heard about our kids is that a farm is a great place for kids. Kids on farms conjures up a variety of images for me, which may be different than those visualized by most of you. I used to picture children feeding the animals, enjoying the open spaces, or pulling a crispy carrot from the ground and eating it. There are also a lot of things I never quite pictured until the last few weeks.

The pasture behind our house is does not grow tall enough for the cows to graze until nearly June, so last fall when we planted our farm cover crops, we planted things that would help our soil through the winter, but we also had the goal of growing cow food for spring. So, for the last few weeks we have been cutting our cereal rye and field pea cover crop and taking it to the cows. Not all of the three cows walks well on a leash, so two cows have been able to walk to the on-farm grazing and one has to stay home and eat from the wheelbarrow. While I cut my bushels of cow food every evening from the 4-foot tall mini-fields, the kids have taken to blazing trails through the vegetation, hunting dragons and wolves with their various weapons of choice, while I yell at them to “watch out for the hot wire”. I never pictured that.

Finally, summer-like weather has arrived, and with it comes the scanty clothing of warm temperatures. We have had to turn our rows of sprinklers on to irrigate the small spinach, arugula, and bok choi. Mike and I were planting a new patch of all those things last night when the kids figure out that they can run down the parallel rows of little plants in order to be sprayed by the water, while we yell “stay in the wheelrows—don’t step on the little plants!” I never pictured that.

Dave, our resident mechanic, found the kids a battery-powered, kid-sized car last week. They take turns driving it around the farm and both of them have become proficient at staying on the driveways and out of the spinach. It’s pretty cute, really, and they work together at getting it un-stuck, most of the time. This afternoon they hit a water valve in one of the driveways with one of their car wheels, purely accidentally. This made a lovely mud pond, and the kids took no time in stripping down to their birthday suits and rolling in the mud. At least they remembered my last rant about not rolling in the mud in their clothes because it’s hard to wash it all out. So if you saw the mud-clad mini-streakers during pickup on Wednesday, that’s the story. I surely never pictured that.

It’s easier to visualize kids spending all day outside in the fresh air and sunshine, wandering 15 acres, with pretty much no worries, helping themselves to blackberries, peas, carrots, and cherry tomatoes. Maybe stopping for a snack of milk and bread in the house after a long, hard morning of slug hunting in the garlic patch or hunting those little white cabbage butterflies with a pink butterfly net for a quarter a piece. Maybe learning to patiently wrap a rubber band around a bunch of mint, or helping to carry the bunches of swiss chard or pea vines to the box at the end of the row. Or even rounding-up escaped baby pigs by herding them from a mini-car?

>Spring Week 9 (Stinging Nettles)

>THIS WEEK’S SUBSCRIBER MENU
• Carrots
• Parsnips
• Leeks
• Stinging Nettles or Swiss Chard (*see notes at the bottom for using Stinging Nettles)
• Pea Shoots or Spinach
• Kale or Collard Greens

COMING SOON
• Arugula
• Radishes
• Spring Mix

*STINGING NETTLE NOTES
These are a great and healthful green to eat, but they must only be eaten cooked. Take care when handling, they will sting while raw. It takes very little cooking to shed the stinging. Just blanch quickly in boiling water, or steam—they can even be dried.

The Nettle tribe, Urticaceae, is widely spread over the world and contains about 500 species, mainly tropical, though several, like our common Stinging Nettle, occur widely in temperate climates. Many of the species have stinging hairs on their stems and leaves, and many are much more painful than ours.

The Stinging Nettle species, belonging to the genus Urtica (the name derived from the Latin, uro, to burn), are well known for the burning properties of the fluid contained in the stinging hairs with which the leaves are so well armed.
Livestock will not approach a living nettle bed, but will happily eat the wilted stems and leaves. We have started feeding nettles to our hens as it is reported to increase egg-laying. Some cheesemakers extract a form of vegetable rennet from green nettles, and the boiled leaves make a green fabric dye.

SAUTEED NETTLES WITH GREEN GARLIC & OLIVE OIL
1 1⁄4 # Nettles, Cleaned
3T Green Garlic (Chopped)
1/2 cup Olive Oil
Salt & Pepper (To Taste)
1. First preheat a large sauté pan on medium high heat, (one large enough to accommodate the
nettles—you can use a large pot as well).
2. Pour 1⁄4 cup of the olive oil into the preheated pan. Then put all of the green garlic into the pan sauté briefly for about 30 seconds, just enough time for the green garlic to release its essential oils, being sure not to brown or burn the green garlic. Place the nettles into the pan and give it a good stir, let sit for just a second and then continue the stirring process.
3. Once the nettles are completely wilted place them on a plate, drizzle with the rest of the
olive oil and place a couple of lemon wedges for garnish.

NETTLE FRITTATA
1/2# Cleaned Nettle Tops
4 tbsp. Extra Virgin Olive Oil
1 Garlic Clove, Chopped
6 Large Organic Eggs
1/4 cup Heavy Cream
Salt & Pepper to Taste
1. Preheat oven to 300º Cook one-third of the nettles in one tablespoon of the olive oil in a non-stick pan. Cook until tender adding a small amount of water if needed. Repeat this 2 more times adding the garlic on the third batch.
2. Place all of the cooked nettles on a cutting board and chop finely. Place the nettles in a bowl of a food processor with the eggs, salt, pepper and process until the nettles are incorporated into the eggs. Add the cream and process for 10 seconds.
3. Heat the non-stick pan on medium with the remaining tablespoon of oil. Add the nettle mixture and with a rubber spatula move the eggs around to get the entire mixture warm. Place into the oven and cook for about 12 minutes. Let cool for 3 minutes then turn the frittata out onto a plate and cut

NETTLE SOUP
1⁄2 lb. fresh nettles
1 quart chicken broth
1 hard boiled egg
1 tbs. butter
1. Rinse nettles. The soft stalks can be used, but if you pick nettles of fully grown plants, use only the leaves. Put rinsed nettles in a pan with a quart of water. Put to a boil. Push down the nettles into the water. When all nettles have been softened, drain liquid from nettles. Puree the nettles and mix with the chicken broth.
2. Heat up mixture, add salt and pepper to taste. Add chives, or a dash of garlic if desired. As this is considered a spring dish in Scandinavia and Russia, an egg, which symbolizes rebirth, is often added. You may add some lovely quail eggs, or half an egg. The white and yellow looks especially nice as a center piece of the soup. The most elegant version is to chop an egg and mix it with soft butter. Put mixture onto some plastic wrap, and form into a sausage. Refrigerate until hardened. When ready to serve soup, cut egg/butter mixture into thick slices and put into center of soup plates.

>Biofuels

>I remember when I first started hearing about biodiesel. It was about two years ago. I was ready to buck the system, trade-in all our vehicles for diesel versions and build a digester to make our own fuel. Our house runs on heating oil too. And the tractors. I dreamed we’d be able to stop by McDonalds and Taco Time on the way home from delivering produce and never have to buy fuel again. I thought the whole idea was to build fuels by recycling something that wasn’t being used. How great was that! I got all excited about having a solar house, a windmill to power the heat lamps in the pig barn. Maybe we wouldn’t generate enough power to run the walk-in cooler, but hey, we’d be really close to being self-sufficient.

At that time, a few of the other vendors at the farmers markets were using biodiesel in their trucks. The exhaust wasn’t black and stinky—it smelled like french fries. It took me a few days to figure it out, after all there is a Jack In The Box across the street from the market, and a number of litttle restaurants. But, wow! It was just the biodiesel. I was sold. Unfortunately, the digesting machine was several thousand dollars, and we were having a hard time making ends meet with babysitters and employees. So it moved to the back burner.

Now I hear that with all the government initiatives (thank you Ms. Gregoire) that Washington is going to be growing a LOT of canola for oil, to process into biodiesel. Other states will be growing more soy, also for oil to convert into biodiesel. I would imagine that the big biotech agriculture companies are behind it as well—another use for genetically modified varieties, AND they could sell more herbicides and other chemicals because the crops aren’t going to be eaten! It’s a win-win deal for everyone, isn’t it?

But, whoa. What happened to all the recycling of oil? There’s a new show on the Sundance Channel, actually a series of shows called “The Green”. I subscribed to the Showtime package just to get this show, although you can see a lot of the top spots online at http://www.sundance.com/thegreen. What I saw the first episode I caught was a race-car driver who pulled up to the track with a deep fryer and a chicken. He attracted a lot of attention as he dropped the chicken in and it started cooking. Mmmm, everyone wanted a piece. Then, when he was done, he poured the used grease into his gas tank. He took off and drove really fast. (I don’t know how fast, you’d have to ask Mike. I was just fascinated with the idea of pouring the oil in the car.)

Seattle Biodiesel explains on their website that they are working to help Washington farmers by contracting to grow the finest quality feedstock oils for refinement—they call it “bioneering”. “Seattle Biodiesel works directly with regional farmers to develop the finest feedstock oils for use in our processors. We do not use waste vegetable oil (wvo) at this time.” According to the Biodiesel Board, part of the Department of Energy (http://www.eere.energy.gov/afdc/altfuel/biodiesel.html), biodiesel “can be manufactured from vegetable oils, animal fats, or recycled restaurant greases.” So why aren’t we hearing more about recycling the used fats? In the meantime, more cropland will be pushed to its limit growing these oil crops with tons of chemicals. It’s fairly obvious whose profits drive this industry, isn’t it?